How To Decrease & Increase The Diamond Mesh Stitch?
Unlock the secrets of the Diamond Mesh Stitch! Learn how to decrease and increase for perfect patterns with our expert guide.
Author:Suleman ShahReviewer:Han JuDec 11, 202450.1K Shares668.9K Views
The diamond mesh stitch is a popular and versatile knitting technique that creates a beautiful openwork pattern, perfect for scarves, shawls, and lightweight garments. Learning how to decrease and increase the diamond mesh stitch is essential for achieving a professional finish and customizing your projects. This comprehensive guide will provide detailed instructions and tips for both decreasing and increasing the diamond mesh stitch, ensuring you can create stunning knitted pieces with confidence.
Understanding The Diamond Mesh Stitch
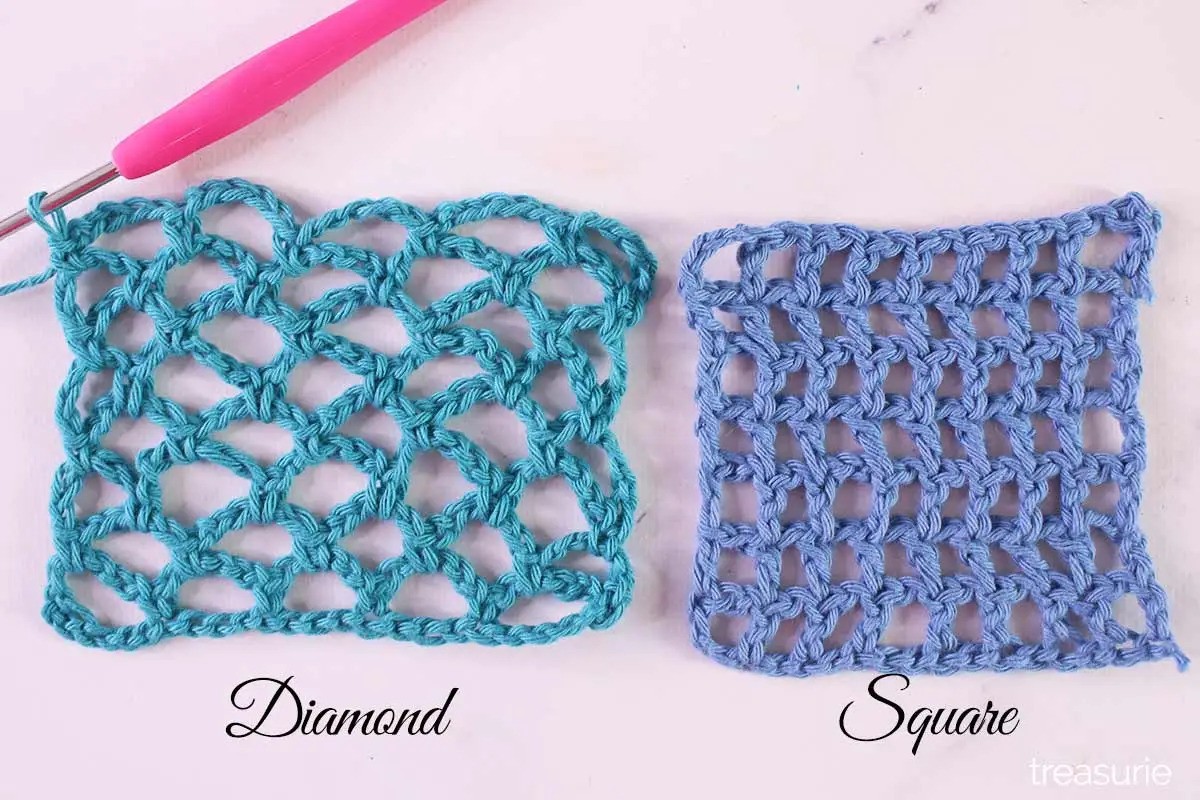
What Is The Diamond Mesh Stitch?
The diamond mesh stitch is a lace knitting pattern characterized by its diamond-shaped openwork design. It is created using a combination of yarn overs and decreases, resulting in a lightweight and airy fabric. This stitch is ideal for creating delicate, textured patterns that add visual interest to your knitting projects.
Basic Diamond Mesh Stitch Pattern
Before diving into decreasing and increasing, it's important to understand the basic diamond mesh stitch pattern. Here is a simple version to get you started:
- Cast On: A multiple of 4 stitches, plus 1 extra stitch.
- Row 1(RS): K1, *yo, k2tog, yo, k1; repeat from * to end.
- Row 2(WS): Purl all stitches.
- Row 3(RS): K1, *k2tog, yo, k1, yo; repeat from * to end.
- Row 4(WS): Purl all stitches.
Repeat these four rows to create the diamond mesh pattern.
How To Decrease The Diamond Mesh Stitch
Decreasing in the diamond mesh stitch involves reducing the number of stitches while maintaining the pattern's integrity. This technique is useful for shaping your knitted piece, such as tapering the end of a shawl or creating armholes.
Types Of Decreases
- K2tog (Knit Two Together): A common decrease that slants to the right.
- SSK (Slip, Slip, Knit): A left-leaning decrease.
Step-by-Step Decreasing Instructions
Simple Decrease
- Identify Decrease Point: Determine where you want to place the decrease within the pattern.
- K2tog/SSK: Replace a knit stitch with either K2tog or SSK, depending on the desired slant.
- Maintain Yarn Overs: Ensure yarn overs are placed correctly to keep the pattern open.
Example: Decreasing On Row 1
If you want to decrease one stitch on Row 1:
- Original: K1, *yo, k2tog, yo, k1; repeat from * to end.
- With Decrease: K1, *yo, k2tog, yo, k1; repeat from * to last 3 stitches, k2tog, k1.
This adjustment decreases one stitch while preserving the overall pattern.
Tips For Successful Decreases
- Consistent Tension: Maintain even tension to ensure the pattern remains uniform.
- Track Decreases: Keep a record of where decreases are made to ensure symmetry and consistency.
- Practice: Practice decreasing on a swatch to build confidence before working on your main project.
How To Increase The Diamond Mesh Stitch
Increasing in the diamond mesh stitch involves adding stitches while maintaining the pattern's continuity. This technique is useful for expanding the width of your project, such as creating a flared shawl or adding shaping to a garment.
Types Of Increases
- Yarn Over (YO): A common increase used in lace knitting to create an open stitch.
- M1 (Make One): A more discreet increase that does not create an open hole.
Step-by-Step Increasing Instructions
Simple Increase
- Identify Increase Point: Determine where you want to place the increase within the pattern.
- YO or M1: Add a yarn over or make one increase as needed.
- Maintain Pattern: Adjust surrounding stitches to maintain the pattern's integrity.
Example: Increasing On Row 1
If you want to increase one stitch on Row 1:
- Original: K1, *yo, k2tog, yo, k1; repeat from * to end.
- With Increase: K1, *yo, k2tog, yo, k1; repeat from * to last 2 stitches, yo, k2.
This adjustment increases one stitch while keeping the overall pattern intact.
Tips For Successful Increases
- Balanced Increases: Distribute increases evenly to maintain symmetry.
- Pattern Adjustment: Adjust the pattern as necessary to incorporate new stitches smoothly.
- Practice: Practice increasing on a swatch to ensure you understand how it affects the pattern.
Practical Applications And Patterns
Creating Shaped Garments
Using decreases and increases effectively allows you to shape garments such as sweaters, shawls, and scarves. For example, you can create a triangular shawl by decreasing stitches along the edges while maintaining the diamond mesh pattern in the center.
Customizing Patterns
Adjusting the number of stitches in the diamond mesh pattern enables you to customize existing patterns or create your own designs. Experiment with different placements of increases and decreases to achieve the desired shape and size.
Sample Pattern: Diamond Mesh Shawl
Materials
- Yarn: Fingering weight yarn
- Needles: Size US 6 (4mm) knitting needles
- Notions: Stitch markers, tapestry needle
Instructions
- Row 7: K1, *yo, k2tog, yo, k1; repeat from * to last 2 stitches, yo, k2.
- Row 8: Purl all stitches.
- Row 5: K1, *yo, k2tog, yo, k1; repeat from * to last 3 stitches, k2tog, k1.
- Row 6: Purl all stitches.
- Cast On: 85 stitches (multiple of 4 + 1).
- Set Up Row(WS): Purl all stitches.
- Row 1(RS): K1, *yo, k2tog, yo, k1; repeat from * to end.
- Row 2(WS): Purl all stitches.
- Row 3(RS): K1, *k2tog, yo, k1, yo; repeat from * to end.
- Row 4(WS): Purl all stitches.
- Decrease Rows:
- Increase Rows:
Repeat Rows 1-8 until the shawl reaches the desired length. Bind off and weave in ends.
Troubleshooting Common Issues
Uneven Tension
Uneven tension can cause the diamond mesh pattern to appear irregular. Practice maintaining consistent tension throughout your knitting to ensure a uniform appearance.
Misplaced Yarn Overs
Misplaced yarn overs can disrupt the pattern. Double-check your work periodically to ensure yarn overs are placed correctly.
Correcting Mistakes
If you make a mistake, use a lifeline (a piece of contrasting yarn threaded through a row of stitches) to rip back to a known correct point. This technique makes it easier to correct errors without losing your progress.
FAQs About How To Decrease & Increase The Diamond Mesh Stitch?
What Is The Best Yarn For The Diamond Mesh Stitch?
Fingering or lace weight yarns work best for the diamond mesh stitch, as they highlight the delicate openwork pattern. However, you can experiment with different yarn weights to achieve various effects.
How Do I Fix A Dropped Stitch In The Diamond Mesh Stitch?
To fix a dropped stitch, use a crochet hook to carefully pick up the stitch and ladder it back up to the correct row. Ensure you maintain the pattern by correctly placing yarn overs and decreases as you repair the stitch.
Can I Use The Diamond Mesh Stitch For Garments?
Yes, the diamond mesh stitch is suitable for garments such as shawls, scarves, and lightweight sweaters. Its openwork design adds a decorative touch and allows for breathability.
How Do I Block A Project With The Diamond Mesh Stitch?
To block a project, soak it in lukewarm water with a mild detergent. Gently squeeze out excess water, then lay the project flat on a blocking mat. Use rust-proof pins to shape and stretch the fabric, ensuring the diamond mesh pattern opens up and lies flat. Allow it to dry completely.
Can I Combine The Diamond Mesh Stitch With Other Patterns?
Yes, the diamond mesh stitch can be combined with other stitch patterns to create unique designs. For example, you can alternate sections of diamond mesh with sections of stockinette or garter stitch for added texture and interest.
Conclusion
Mastering the diamond mesh stitch and learning how to decrease and increase within the pattern opens up a world of creative possibilities for your knitting projects. Whether you're shaping a garment, customizing a pattern, or simply exploring new techniques, understanding these skills is essential. By following this comprehensive guide and practicing the provided instructions and tips, you'll be well-equipped to create stunning, professional-looking pieces with the diamond mesh stitch.

Suleman Shah
Author
Suleman Shah is a researcher and freelance writer. As a researcher, he has worked with MNS University of Agriculture, Multan (Pakistan) and Texas A & M University (USA). He regularly writes science articles and blogs for science news website immersse.com and open access publishers OA Publishing London and Scientific Times. He loves to keep himself updated on scientific developments and convert these developments into everyday language to update the readers about the developments in the scientific era. His primary research focus is Plant sciences, and he contributed to this field by publishing his research in scientific journals and presenting his work at many Conferences.
Shah graduated from the University of Agriculture Faisalabad (Pakistan) and started his professional carrier with Jaffer Agro Services and later with the Agriculture Department of the Government of Pakistan. His research interest compelled and attracted him to proceed with his carrier in Plant sciences research. So, he started his Ph.D. in Soil Science at MNS University of Agriculture Multan (Pakistan). Later, he started working as a visiting scholar with Texas A&M University (USA).
Shah’s experience with big Open Excess publishers like Springers, Frontiers, MDPI, etc., testified to his belief in Open Access as a barrier-removing mechanism between researchers and the readers of their research. Shah believes that Open Access is revolutionizing the publication process and benefitting research in all fields.

Han Ju
Reviewer
Hello! I'm Han Ju, the heart behind World Wide Journals. My life is a unique tapestry woven from the threads of news, spirituality, and science, enriched by melodies from my guitar. Raised amidst tales of the ancient and the arcane, I developed a keen eye for the stories that truly matter. Through my work, I seek to bridge the seen with the unseen, marrying the rigor of science with the depth of spirituality.
Each article at World Wide Journals is a piece of this ongoing quest, blending analysis with personal reflection. Whether exploring quantum frontiers or strumming chords under the stars, my aim is to inspire and provoke thought, inviting you into a world where every discovery is a note in the grand symphony of existence.
Welcome aboard this journey of insight and exploration, where curiosity leads and music guides.
Latest Articles
Popular Articles